How do I configure Refapp for Single Sign-on?

Configuring Refapp for Single Sign-on

Refapp supports single sign-on through the SAML 2.0 interoperability standard.

The vendors currently tested and supported are:

  • Microsoft Entra ID (née Azure AD / Active Directory)
  • Microsoft Active Directory Federation Services (AD FS)
  • Octa

New section in Company Settings

As a Refapp Administrator, you can manage all the SAML SSO configuration from your Company Settings page and its SAML SSO Settings section.

The master switch is named Authentication via SAML SSO.

Authentication via SAML SSO

This is the master switch. When enabled and if there is valid metadata, logins via SSO will be enabled.

Disable user auto-provisioning for SSO

When turned on, new users will need to be created manually by you on the Refapp Users page. When turned off, users are automatically created in Refapp when they log in the first time.

Login via password disabled when SSO is enabled

When this switch is turned on and SSO is enabled, users can no longer log in using their existing passwords.

SAML Entity ID

The default value for entity ID is an automatically generated unique value like the one in the picture below.

Skärmavbild 2023-10-04 kl. 14.00.21

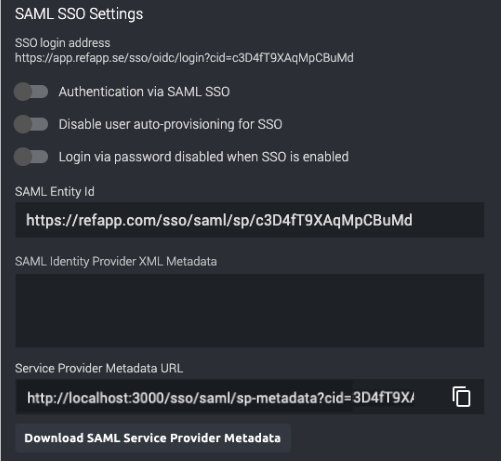
SAML Identity Provider xml Metadata

Paste the content of the xml metadata file that you download from your SAML service provider into this field.

This is what changes when SSO is enabled

  • Users can no longer log on using passwords (unless “Login via password disabled when SSO is enabled” is left in an off state) or change their passwords through Refapp.
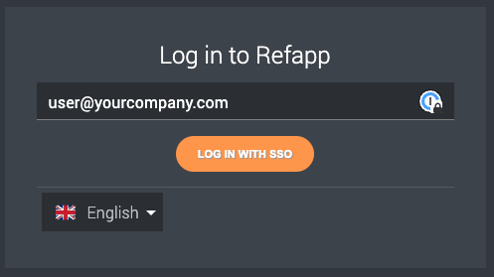
  • When the system detects a mail domain belonging to your company, the login user interface will change to show only a button that takes the user to your company login page. If the login is successful and it has been validated that the user is provisioned to use Refapp, they will be logged into Refapp and can use the system as usual.

  Skärmavbild 2022-08-17 kl. 14.20.18

  • If “Disable user auto-provisioning for SSO” is left deselected, users can no longer be invited from the Refapp Users page 
  • The cached Refapp login token (stored in-browser) for SSO-enabled companies will expire after 24 hours (instead of 30 days for user/password logins) at which point the system will trigger a renewed login with your SSO system. This ensures that users can be offboarded properly.
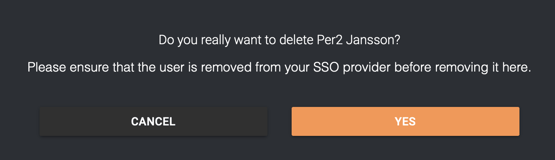
  • If you need to expedite offboarding, you can delete a user from Refapp through the Users page after removing the user’s access to the application in the SSO application. All user sessions will be terminated immediately. If you keep the user’s access and remove the user from Refapp, a brand new user with the same name will be created at their next login. This will lead to confusion. SSO-bild 2
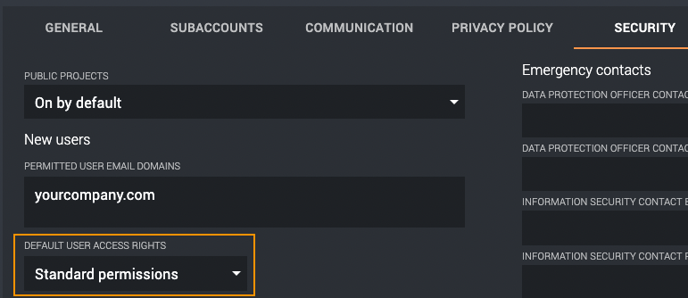
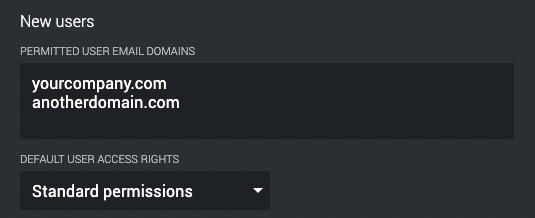
  • If you have left the company setting Disable user auto-provisioning for SSO turned off, new users are onboarded automatically at login time and will be assigned the Default user access rights set on the Company Settings page. If they need extended permissions, your company’s assigned admin users need to perform that action through the Users page in Refapp after they have logged in the first time.  Skärmavbild 2022-08-17 kl. 14.31.22
  • Users get a new option to log out completely from the SSO provider at the bottom of the profile page.

Preparations

Ensure that you have set up the corresponding mail domains for SSO in Company Settings. Multiple domains, e.g. “brand1.yourcompany.com” and “brand2.yourcompany.com” are supported.

Skärmavbild 2022-08-17 kl. 14.32.44

Continue with the Identity Provider platform of your choice:

  1. Configuring Entra/Azure AD for Refapp SSO
  2. Configuring Microsoft Active Directory Federation Services for Refapp SSO
  3. Configuring other Identity Providers for Refapp SSO

Configuring Entra/Azure AD for Refapp SSO

Microsoft has renamed Azure AD to Entra ID mid-2023. You might see either name used, it refers to the same thing.

  1. Create a “Non-gallery” Enterprise Application in the Entra Portal. SSO-bild 3 
  2. Add the following entries in the “Single sign-on” SAML pane:
    1. Identifier: use the entity id value shown in Refapp.
    2. Reply URLs:
      • If your account is on the "app" instance (app.refapp.se, app.refapp.com):
        • https://app.refapp.se/sso/saml/acs
        • https://app.refapp.com/sso/saml/acs
      • If your account is on the "sec" instance (sec.refapp.se):
        • https://sec.refapp.se/sso/saml/acs
    1. Sign on URL (optional): Similar to https://app.refapp.se/sso/saml/login?cid=<company id>. You get this value from the Refapp Company Settings page (SSO login address). This allows your users to initiate the Refapp login through e.g. https://myapps.microsoft.com.

      SSO-bild 4
  1. Assign users/groups to the application according to your normal operating procedures. Make sure to manage claim to change the source attribute from user.userpricipalname to user.mail for the users created in Refapp to be created with the right email.
    image (6) 
  2. Download the “Federation Metadata XML” file. SSO-setting08
  3. Provide the SAML Application Identifier (Entity Id) and metadata content in the Company Settings page, turn on SAML SSO (“Authentication via SAML SSO”) and test that login to Refapp works.

Configuring Microsoft Active Directory Federation Services for Refapp SSO

  1. Open the Refapp Company Setting page.
  2. Specify your wanted SAML Identity ID (or leave it blank) and save the settings.
  3. Click the “Download SAML Service Provider Metadata” button.
  4. Open the ADFS management console. This can be done from Server Manager as shown below: SSO-setting09
  5. Click the button on the right for Add a Relying Party Trust. SSO-setting10
  6. This opens a wizard for the trust with a welcome screen describing the feature. Review the description and click Start to begin.
  7. Import the SAML Provider Metadata file you downloaded previously. SSO-setting11
  8. Provide a display name for the Trust, “Refapp” or something similar is recommended and click Next.
  9. Finish the rest of the steps.
  10. We recommend two Claim Rules for brokering the SAML assertions. They can be added by first clicking the Add Rule button. SSO-setting12
  11. This first rule is an LDAP Attributes rule that ensures the required information is passed between the two systems. Configure the rule as shown below and click OK to save. (Make sure to use three separate fields for “E-Mail-Addresses, Given-Name, and Surname” or else some relevant info may be left as “None” later on.) SSO-setting13
  12. The second rule is a Transform rule. Refapp specifies urn:oasis:names:tc:SAML:1.1:nameid-format:emailAddress for the Format of the NameIDPolicy in Assertion Requests where ADFS natively expects these in Name ID format so we need to transform the format from email to Name ID. Select Transform an Incoming Claim from the drop-down and click Next to continue. SSO-setting14
  13. Input the configuration as shown below and click Finish. SSO-setting15
  14. Save the new claim rules by clicking OK.

Save the new claim rules by clicking OK. SSO-setting16

Configuring other Identity Providers for Refapp SSO

Refapp supports the HTTP redirect and HTTP POST bindings (i.e. transport mechanisms) to facilitate communications with the Identity Provider.

NameID

Refapp supports 2 options for NameID. By default it will opt to use email addresses, contact Refapp support to have your account upgraded to persistent IDs.

Format Description
urn:oasis:names:tc:SAML:1.1:nameid-format:persistent A unique persistent ID that identifies the user in the IdP. If this format is used, the email address attribute is required.
urn:oasis:names:tc:SAML:1.1:nameid-format:emailAddress A unique ID in the form of an email address to identify the user.
If the email address attribute is not provided separately, this value will be used as the user’s email.

Required Attributes (Claims):

All attributes are of the Name Format urn:oasis:names:tc:SAML:2.0:attrname-format:basic.

Attribute Name (Claim) Description
http://schemas.xmlsoap.org/ws/2005/05/identity/claims/emailaddress The email address of the user, to be used for contacting the user and exposing externally to candidates/referees.
http://schemas.xmlsoap.org/ws/2005/05/identity/claims/givenname Given name (first name) of the user.
http://schemas.xmlsoap.org/ws/2005/05/identity/claims/surname

Surname (last name) of the user.

Extra Attributes:

All attributes are of the Name Format urn:oasis:names:tc:SAML:2.0:attrname-format:basic.

Attribute Name (Claim) Description
http://schemas.microsoft.com/identity/claims/displayname Used as a fallback for given name and surname if those are not defined.
http://schemas.microsoft.com/ws/2008/06/identity/claims/role

Zero or more (multi-value!) of the values in the list below, will be used as the role in the Refapp RBAC.

If the attribute exists but has no values, the user will not be able to log in. If there are several values, the one with the highest level of access is chosen.

Example: if both Administrator and User are provided, the account is given Administrator access.

Values:

  • Administrator
  • SubaccountAdministrator
  • PowerUser
  • User
  • LimitedUser
  • MeetingNoteTaker

For configuration in Entra ID, see documentation on RBAC for applications.

cost-center An identifier used to divide users between internal cost centers.
phone-number Phone number assigned to the Refapp user profile.