Need to configure another SSO type for your company? Click on the name of the SSO type to be redirected to the guide.
- Configuring Entra/Azure AD for Refapp SSO
- Configuring Microsoft Active Directory Federation Services for Refapp SSO
Extra attributes / Claims
Configuring SSO add-ons
Map access rights via SSO
Subbaccount Mapping
**You can click here for a guide covering everything within SSO.**
Configuring other Identity Providers for Refapp SSO
Refapp supports the HTTP redirect and HTTP POST bindings (i.e. transport mechanisms) to facilitate communications with the Identity Provider.
NameID
| Format | Description |
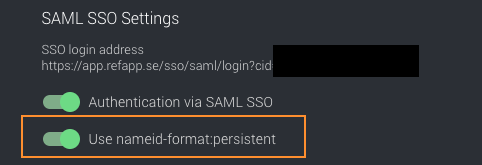
| urn:oasis:names:tc:SAML:1.1:nameid-format:persistent | A unique persistent ID that identifies the user in the IdP. If this format is used, the email address attribute is required. |
Customers who prefer to use email addresses as the NameID must update their settings accordingly.

| Format | Description |
|
urn:oasis:names:tc:SAML:1.1:nameid-format:emailAddress |
A unique ID in the form of an email address to identify the user. If the email address attribute is not provided separately, this value will be used as the user’s email. If no changes are made, the system will automatically use persistent IDs as the default identifier. |
Required Attributes (Claims):
All attributes are of the Name Format urn:oasis:names:tc:SAML:2.0:attrname-format:basic.
| Attribute Name (Claim) | Description |
| http://schemas.xmlsoap.org/ws/2005/05/identity/claims/emailaddress | The email address of the user, to be used for contacting the user and exposing externally to candidates/referees. |
| http://schemas.xmlsoap.org/ws/2005/05/identity/claims/givenname | Given name (first name) of the user. |
| http://schemas.xmlsoap.org/ws/2005/05/identity/claims/surname |
Surname (last name) of the user. |
Extra Attributes:
All attributes are of the Name Format urn:oasis:names:tc:SAML:2.0:attrname-format:basic.
| Type | Attribute Name (Claim) | Description |
| Display Name | http://schemas.microsoft.com/identity/claims/displayname | Used as a fallback for given name and surname if those are not defined. |
| Role | http://schemas.microsoft.com/ws/2008/06/identity/claims/role |
Zero or more (multi-value!) of the values in the lists below. Refapp distinguishes between core roles (which control general access) and background check roles (which control background check access). Core roles are mutually exclusive — if several are provided, the one with the highest level of access is chosen. Example: if both Administrator and User are provided, the account is given Administrator access. Background check roles are additive — a user can have any combination of them alongside their core role. However, users with the core role None or MeetingNoteTaker cannot have background check roles. If the attribute exists but has no values, the user will not be able to log in. Core roles (mutually exclusive):
Background check roles (additive, requires Background Checking to be enabled):
For configuration in Entra ID, see documentation on RBAC for applications. |
| Cost-center | cost-center | An identifier used to divide users between internal cost centers. |
| Phone-number | phone-number | Phone number assigned to the Refapp user profile. |
Configuring SSO add-ons
Plus addressing fallback
Enabling this feature is helpful if your organisation works in different accounts (not sub-accounts) in Refapp. If the same user requires access to multiple accounts through SSO.
The setting is placed on the account so that users can log in with the same email address. When the administrator sets it up, they input what the fallback should be. Users don't need to do anything during login; the system recognizes that there's a fallback for that domain and creates a user with the fallback on the account being logged into after the user was created on the other account.
Map access rights via SSO
This feature can automate the process of assigning user roles, reducing the manual work required by administrators. Users can be assigned roles based on their specific attributes, ensuring that they only have access to the resources they need. This can help to improve security by ensuring that users only have access to the level of access they require.
-
If your company wants to use this feature, your IT team will need to customize your configuration for Refapp in the SSO Identity provider.
-
We can provide additional guidance on how we implemented this feature using Entra (Azure AD) if your company is using that system.
- See table Extra Attributes and Roles for additional information to set up access-right mapping.
Subbaccount Mapping
Refapp subaccounts are used to separate users into different divisions within your organisation.
A user can be assigned to one or more subaccounts and this controls access to projects, questionnaires, and other data in the system.
When onboarding a new user, the built-in functionality is to use their email domain to map to subaccounts. Administrators can override these settings manually once the user has been onboarded.
In larger organisations, this does not scale well since the email domain is not specific enough to control access to subaccounts.
To solve the issue above, we introduce a new setting for each subaccount when SSO is enabled in Refapp to specify one or more names of SSO IdP groups that should give access to the subaccount.
The corresponding SAML loginResponse payload would then need to contain something like:

in order for the logged-in user to be assigned to the subaccount, i.e. if the user belongs to one of the listed groups, they are assigned.
The name of the attribute (claim) must be one of these:
- The Azure AD default: http://schemas.microsoft.com/ws/2008/06/identity/claims/groups
- The SAML specification default:
http://schemas.xmlsoap.org/claims/Group
Users can have unique IDs alongside their email addresses, guaranteeing the continuity of their Refapp ID even if their email address changes within the customer's identity provider. Enabling persistent IDs requires customers to furnish Refapp with the user's current email address separately.
Administrators can activate it via the "Security" tab in the company settings.

Note! For accounts created after May 13, 2024, this feature is already included.