
Companion to Advanced settings and configuration for other providers. See also SCIM authentication, the supported API surface and frequently asked questions.
SCIM provisioning lets Entra ID create, update and deactivate Refapp users automatically, and place them in the right subaccounts, without anyone logging in first.
Read this page before you change anything in Entra. Most of the steps below fail silently if you skip them: provisioning reports success, users appear, and something is quietly wrong — they cannot sign in, they land in no subaccount, or they all get the wrong role. Each step says what breaks if you miss it.
Configuration happens in two different places in Entra, which is the single most common way to get lost:
| Where | What you configure |
|---|---|
| Single sign-on blade | The NameID and its format, the email claim, the groups claim — all verified, not configured here |
| Provisioning blade | Credentials, externalId, the attribute list, roles, scope, accidental deletion |
If you are looking for a setting and cannot find it, you are almost certainly in the other blade.
Before you start
All four of these must be true before step one. Only the first is something Refapp has to do for you; the other three are yours.
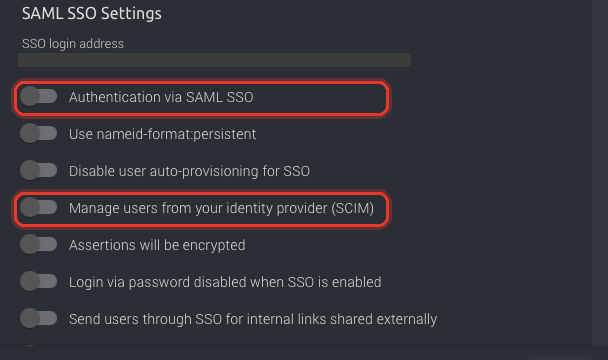
- SCIM configuration has been enabled for your company by Refapp. This is the one step you cannot do yourself — it is set by Refapp staff, and depending on your agreement it may require a change to your licensing. Contact Refapp support to have it enabled. Once it is on, you generate your own token and can see your company id — seeSCIM authentication.Turning provisioning itself on and off is then yours: Company settings → Security → Manage users from your identity provider (SCIM). When to do that is covered in the warning below.
- Use nameid-format:persistent is switched on, under Company settings → Security. You switch this on yourself. Refapp will not issue a SCIM token without it — it is what makes the SAML identity stable enough for SCIM to link against.
- SAML single sign-on is already working, with Authentication via SAML SSO on. Refapp's SCIM implementation is deliberately coupled to SSO — the
externalIdthat SCIM sends is the identity that SAML signs in with.Do not switch SCIM on before SAML works. Switching SCIM on also switches Authentication via SAML SSO on, but Refapp cannot check that your SAML setup actually works, and the consequence is not recoverable on your side: SCIM will provision users and stamp each one with the
externalIdit happens to be sending. If you then turn SAML on with a different NameID attribute, none of those users match, and Refapp will not overwrite an identity it has already stored. Get SSO working, then SCIM. - You have an Entra Enterprise Application for Refapp. If you already have one for SAML SSO, use that same application — it carries both halves.
⚠️ Enabling SCIM turns off automatic user creation from other sources
The moment SCIM user provisioning is turned on for your company, Refapp stops creating users automatically from SAML sign-ins (just-in-time provisioning) and from ATS integrations. SCIM becomes the only thing allowed to create users.
The switch has to come before Entra can connect: Refapp does not accept your SCIM token until Manage users from your identity provider (SCIM) is on, so Test connection fails until then. That leaves a window, from switching it on until the first provisioning cycle has run, where new users cannot be created at all — JIT is off and SCIM is not sending yet. Existing users are not affected and sign in as normal.
Keep that window short:
Generate your token and have this guide to hand first. Then switch on Manage users from your identity provider (SCIM), and work through Part 2, the on-demand check and the first cycle in one sitting, at a time when nobody new is expected to sign in.
Note that the switch sits directly above Authentication via SAML SSO. Get SAML working first — see prerequisite 3.
While SCIM is on, Authentication via SAML SSO, Use nameid-format:persistent and Disable user auto-provisioning for SSO are switched on and locked. Switching SCIM off again unlocks them but leaves them on, so if you go back to SAML on its own and want sign-ins to create users again, switch off Disable user auto-provisioning for SSO yourself.
One application per Refapp environment
An Entra Enterprise Application holds exactly one SCIM tenant URL. Because the Refapp tenant URL contains your company id, one application can provision one company on one Refapp environment.
Nearly all customers use a single Refapp environment and a single company, so one application is all you need. You need a second application only in the exceptions:
- your organisation has companies on two different Refapp environments, or
- you have two separate Refapp companies that both need provisioning.
In those cases the applications are entirely independent — separate assignments, separate mappings, separate tokens. There is no way to point one application at two tenant URLs.
Part 1 — What SCIM needs from your SAML configuration
This part is not new configuration. It is three things to check in the SAML setup you already have. SCIM depends on the first two, and neither announces itself when it is wrong. The third — the groups claim — SCIM replaces, along with rather more of your SAML configuration than most people expect: see And what SCIM takes over at the end of this part.
How to change any of them is covered in Advanced settings and configuration for other providers — this page only says what SCIM requires and what happens if it is not met. Everything is under your application's Single sign-on → Attributes & Claims.
1. Note which attribute your NameID sends
Refapp stores one SSO identity per user. SAML sets it from the NameID; SCIM sets it from externalId. They must be the same directory attribute, or the account SCIM creates is not the account SAML signs into.
Look at Unique User Identifier (Name ID) and write down its source attribute. You will need it again in step 6. For most organisations it is user.userprincipalname.
⚠️ If SSO is already working, do not change it
Your existing users already have an SSO identity stored, taken from whatever your NameID sends today. Refapp never overwrites a stored SSO identity. Switch the NameID to a different attribute now and every existing user keeps the old one, no sign-in ever presents it again, and the link is quietly broken for good.
So this is not a decision — it has already been made for you. Just record the answer.
Only for a brand-new Refapp company with no users yet is the choice open. There, prefer user.objectid: it survives a rename or an address change, and a user principal name does not.
2. Check the NameID format
It must be Persistent or Unspecified.
If it is anything else: Refapp accepts the sign-in and records no SSO identity at all — silently, no error on either side. Every SCIM-created account is then unreachable, because nothing ever matches it. Those two formats are the only ones Refapp treats as a durable identity. This is the hardest failure here to diagnose, because both Entra and Refapp report success throughout.
3. Confirm an explicit emailaddress claim exists
Sourced from user.mail, with user.userprincipalname as a fallback.
Why this needs checking even if it worked before: once any custom claim configuration exists on the application, Entra stops emitting the basic claim set automatically — even where the UI still shows it as enabled — and the email claim silently disappears. The fallback matters separately:
4. If you use groups, confirm the groups claim sends names
The groups claim's source attribute must be cloud_displayname.
If it is not: the default emits group object IDs — opaque GUIDs. Refapp matches groups against subaccount names, and a GUID can never match one, so a SAML sign-in places the user in no subaccount at all.
This governs SAML group mapping, which SCIM replaces. The subaccounts SCIM provisions are matched on the Entra group's
displayNameand never go near this claim, so a broken claim cannot break them — and a fixed one is no substitute for Groups and subaccounts. Fix it anyway if any part of your setup still leans on the claim: it costs nothing now and saves an afternoon later.
And what SCIM takes over
Switching SCIM configuration on does more than add a second channel. For your company, Refapp stops reading most of the SAML claim set. This is the part that catches people out, because nothing in Entra changes and nothing raises an error — the claims still arrive, and Refapp ignores them.
| What used to come from SAML | Where it comes from once SCIM is on |
|---|---|
| Creating a user at first sign-in | The provisioning cycle, before they sign in at all |
| The email address | SCIM, which owns the address it wrote |
| Roles | SCIM's roles attribute — step 8 |
| Cost centre and phone number | SCIM's costCenter and phoneNumbers |
| Subaccounts, from the groups claim | The groups SCIM provisions — Groups and subaccounts |
SAML keeps exactly one job: authenticating the sign-in and identifying the user by NameID. Everything about who exists, what they may do and where they belong moves to SCIM.
Three consequences worth planning for:
- Nobody is created at first sign-in any more, whatever Disable user auto-provisioning for SSO is set to — SCIM's ownership overrides that setting. Someone who has not been provisioned is told "Auto-provisioning of users is disabled by the company administrator". The fix is to assign them to the application in Entra, not to invite them in Refapp.
- Roles keep their source. They still come from the app role assignments you already have; only the transport changes, from the role claim to SCIM's
rolesattribute. Existing assignments carry over untouched. - Subaccounts do not. If your subaccounts are mapped from the SAML groups claim today, turn group provisioning on as well — see Groups and subaccounts — or subaccount membership quietly stops updating. Existing members keep whatever access they have, and no directory change reaches Refapp again.
Part 2 — The Provisioning blade
Open the same application → Provisioning.
The Provisioning area was reorganised by Microsoft. Older guides — including Microsoft's own screenshots and other vendors' — describe one long page with Admin Credentials at the top and Mappingsbelow. It is now split into a left-hand menu: Connectivity, Provisioning, Attribute mapping, Scoping filters, Users and groups. Where this guide names a page, it means an entry in that menu.
5. Connect to Refapp
On the Connectivity page:
| Field | Value |
|---|---|
| Authentication method | Bearer authentication (the default — leave it) |
| Tenant URL | https://app.refapp.com/scim/v2/<your company id> |
| Secret token | The token Refapp gave you |
Your tenant URL uses whichever Refapp host you normally sign in to, and it must be your own if your organisation has a custom Refapp address. The full rules are in SCIM authentication.
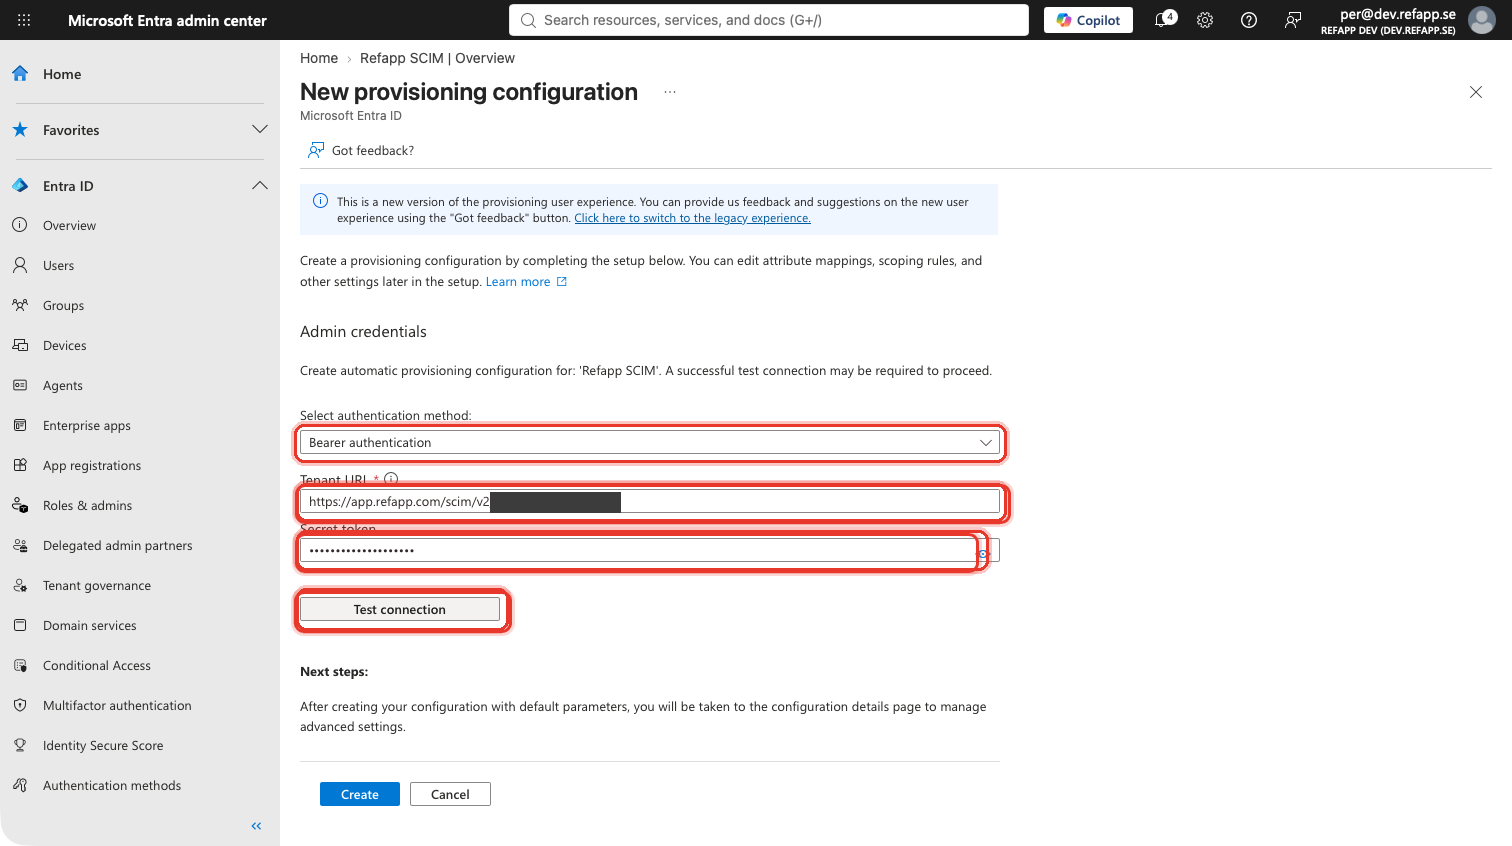
Click Test connection.
Look at the Save/Create button, not at the notification. The success message is a toast that disappears. The reliable signal is that the button becomes enabled — it stays disabled until a connection test has passed.
A green test proves more than that the URL is reachable: Entra tests by issuing a filtered user lookup, so it also proves that the exact query Entra uses to match existing users works against your company.
If the test fails, see troubleshooting a 401. In particular, an error mentioning a "temporary internal storage issue" in the Azure AD service is not a Microsoft outage — it is almost always a rejected token.
6. Point externalId at the same attribute as the NameID
Go to Attribute mapping → Provision Microsoft Entra ID Users, and find the mapping for externalId.
Entra's default is mailNickname, which is always wrong. Change it to the attribute you noted in step 1 — the one your SAML NameID sends:
| Source attribute | Target attribute | |
|---|---|---|
| Entra's default — always wrong | mailNickname |
externalId |
| If your NameID sends the user principal name | userPrincipalName |
externalId |
| If your NameID sends the object id | objectId |
externalId |
There is no universally correct row here. The correct one is whichever matches your NameID. For most organisations with SSO already running, that is userPrincipalName.
This attribute does double duty: it is also what Entra should match existing users on, so getting it right here is what makes the lookup in step 7 work.
If you skip this: this is the step people miss, and its symptom is the most confusing one. Provisioning succeeds — users are created in Refapp, every status is green — but the identity SCIM wrote is a mail nickname while the identity SAML presents is something else entirely. Nobody can log in to any of the accounts that were created, and nothing reports a problem.
If you set it to the wrong attribute rather than skipping it: the same thing happens, and it is worse, because it also cannot be repaired by simply correcting the mapping. Users provisioned with the wrong
externalIdkeep it — Refapp will not overwrite a stored SSO identity — so those accounts have to be fixed with Refapp's help. Get this right before the first cycle runs rather than after.
Leave the active mapping alone. Entra's default for it is an expression that reads Switch([IsSoftDeleted], , "False", "True", "True", "False") — which looks alarming and is simply "active unless the directory account is soft-deleted". That is what makes a disabled or deleted directory account, or an unassigned user, suspend the Refapp user — see Deprovisioning. Keep it exactly as Entra wrote it; there is no need to replace it with anything shorter you may have seen in other guides.
7. Remove the mappings Refapp does not use
Entra pre-fills a long list of attributes, most of which mean nothing to Refapp. Delete the ones that are not in the list below. Sending them does no harm, but a short list is far easier to check and to hand over to whoever maintains it next.
Keep exactly these:
| Source attribute (typical) | Target attribute | Matching precedence |
|---|---|---|
| whichever your NameID sends — see step 6 | externalId |
1 |
mail (see below) |
userName |
2 |
Entra's default Switch(...) — step 6 |
active |
— |
givenName |
name.givenName |
— |
surname |
name.familyName |
— |
mail |
emails[type eq "work"].value |
— |
mobile (or telephoneNumber) |
phoneNumbers[type eq "work"].value |
— |
preferredLanguage |
preferredLanguage |
— |
department |
the enterprise costCenter attribute — see below |
— |
| (added in step 8) | roles |
— |
The cost centre target is the only long one. Entra will not accept an abbreviation, so copy it exactly:
urn:ietf:params:scim:schemas:extension:enterprise:2.0:User:costCenter
Do not delete
preferredLanguage. It looks like optional decoration, and Refapp declares it a required attribute. Keep Entra's default mapping for it.
⚠️ Match on
externalId, not onuserNameBefore touching a user, Entra asks Refapp "do you already have this person?" — by filtering on whichever attribute is marked as the matching attribute. Which one you pick decides whether that question keeps getting the right answer a year from now.
Open each mapping from the attribute list — the pencil at the end of its row — and set:
externalId— Match objects using this attribute: Yes, Matching precedence: 1userName— Match objects using this attribute: Yes, Matching precedence: 2
Why
externalIdleads. It is the identity: the same directory attribute your NameID sends (step 6), and Refapp resolves it against the stored SSO id.userName, by contrast, Refapp resolves as an email address — and email addresses change.The two therefore drift apart the moment someone's address changes and their user principal name does not, which a surname change does routinely. Matching on
userNamethen finds nothing, Entra concludes the user does not exist, tries to create them, and the create fails because that identity is already taken:409 uniqueness — Another user already has externalId a.brandt@example.comThe account exists and is perfectly identifiable. It is simply not reachable by the attribute being matched on. Entra doubles the retry interval after each failure — six hours, then twelve, then twenty-four — so this never resolves itself, and that person stays unprovisioned until someone intervenes. Matching on
externalIdfinds them.Keep
userNameat precedence 2 rather than removing it. Entra tries the matching attributes in order and uses the first that finds someone, souserNamestill catches a user who has no stored SSO id yet — anyone who has never signed in through SAML and was never provisioned. Nothing is lost by keeping it as the fallback.Map
userNamefor that fallback to work, since Refapp resolves it as an email address. Entra's default isuserPrincipalName, which is right only if your UPNs genuinely are your users' email addresses.Send the ordinary address even if your company uses plus-addressing and Refapp stores a labelled one — matching handles that for you. See the FAQ.
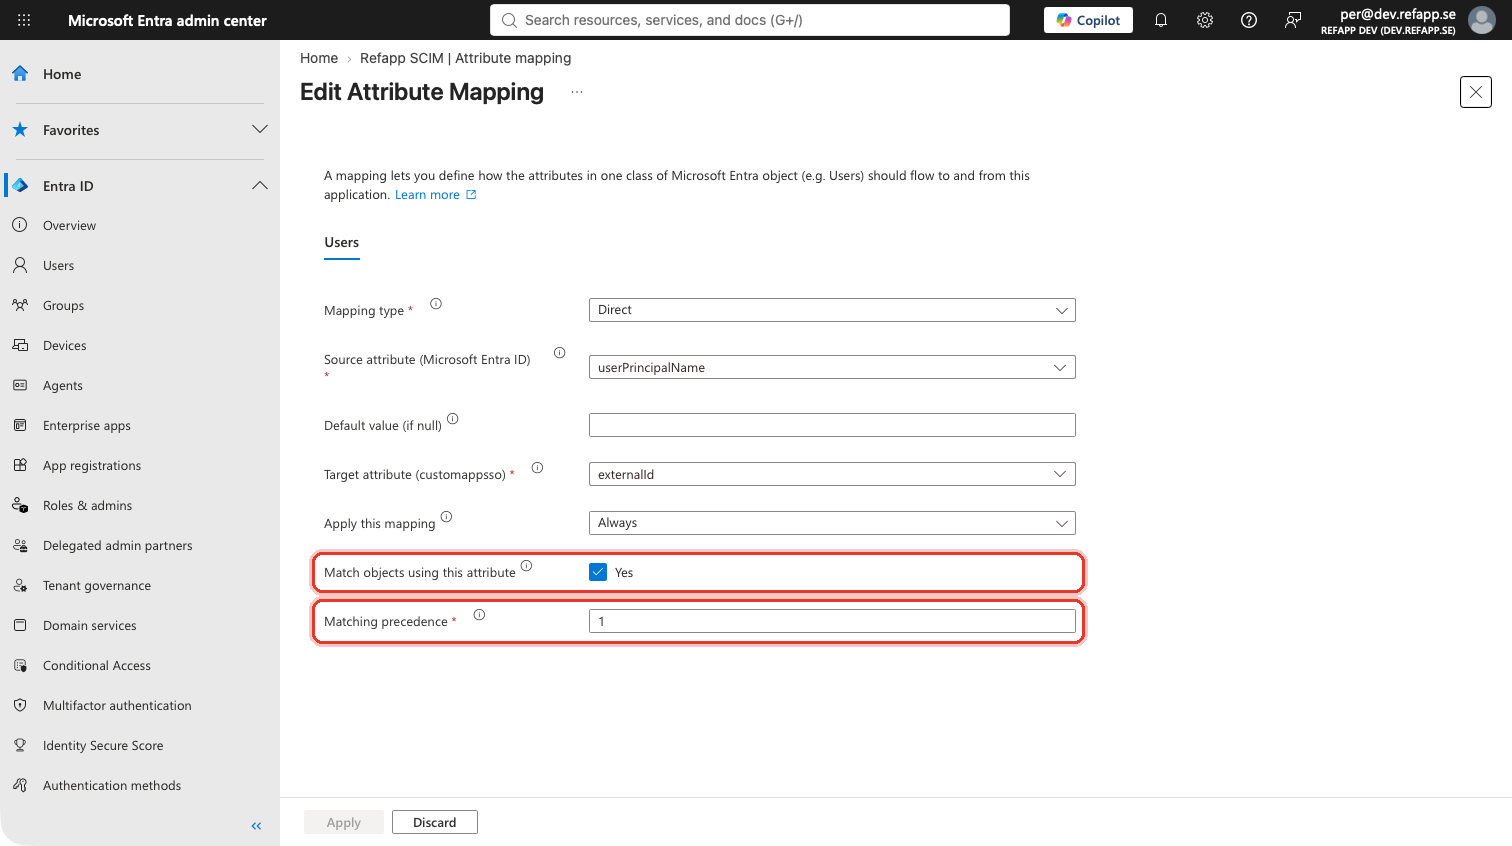
Note that Refapp takes the actual stored address from the emails mapping rather than from userName, and userName is read-only after creation — see the FAQ.
8. Create a roles attribute, then map it
This is the most error-prone step in the guide, and it must be done in this order: the attribute first, the expression second. The expression cannot be saved before the attribute exists.
First, create the attribute. On the Attribute mapping page, open Advanced options → Edit customappsso user attributes in the toolbar.
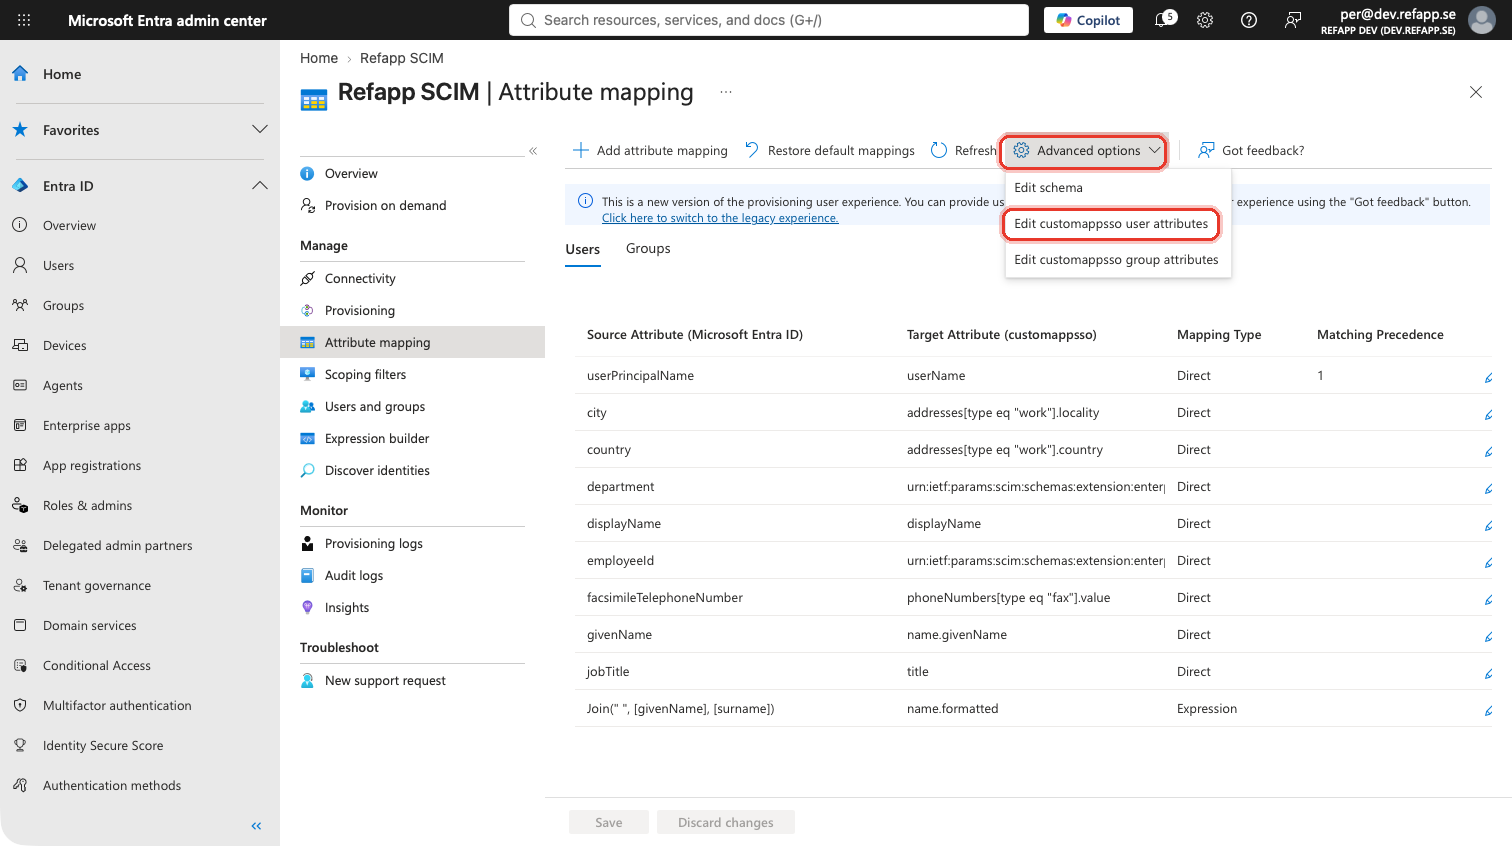
Older guides — including Microsoft's own and other vendors' — call this "Show advanced options → Edit attribute list for customappsso". It is the same thing under a new name and in a new place.
Scroll to the bottom of the list, click + Add new attribute, and fill in:
| Field | Value |
|---|---|
| Name | roles |
| Type | String |
| Multi-value | checked |
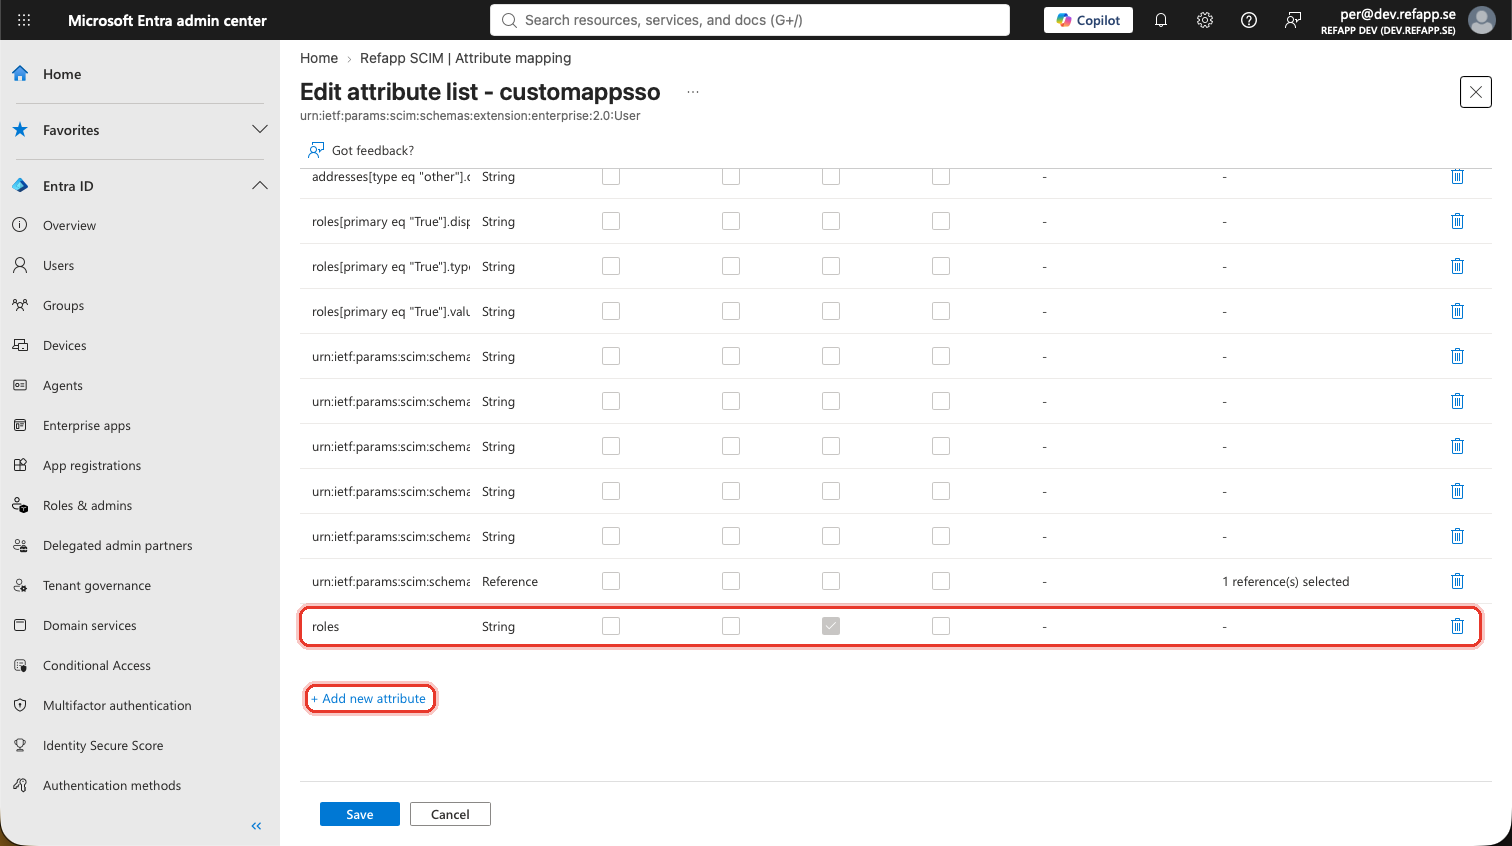
Leave Primary key, Required and Exact case unchecked, and leave Metadata and Referenced object attribute blank. Then Save the attribute list.
Why this is necessary: the default target schema already appears to have roles, as
roles[primary eq "True"].display,.typeand.value. Those are three single-valued attributes, and a user can hold several roles. The expression below will not save against them.
Then, add the mapping. Back on the Attribute mapping page, Add New Mapping:
| Field | Value |
|---|---|
| Mapping type | Expression |
| Expression | AppRoleAssignmentsComplex([appRoleAssignments]) |
| Target attribute | roles |
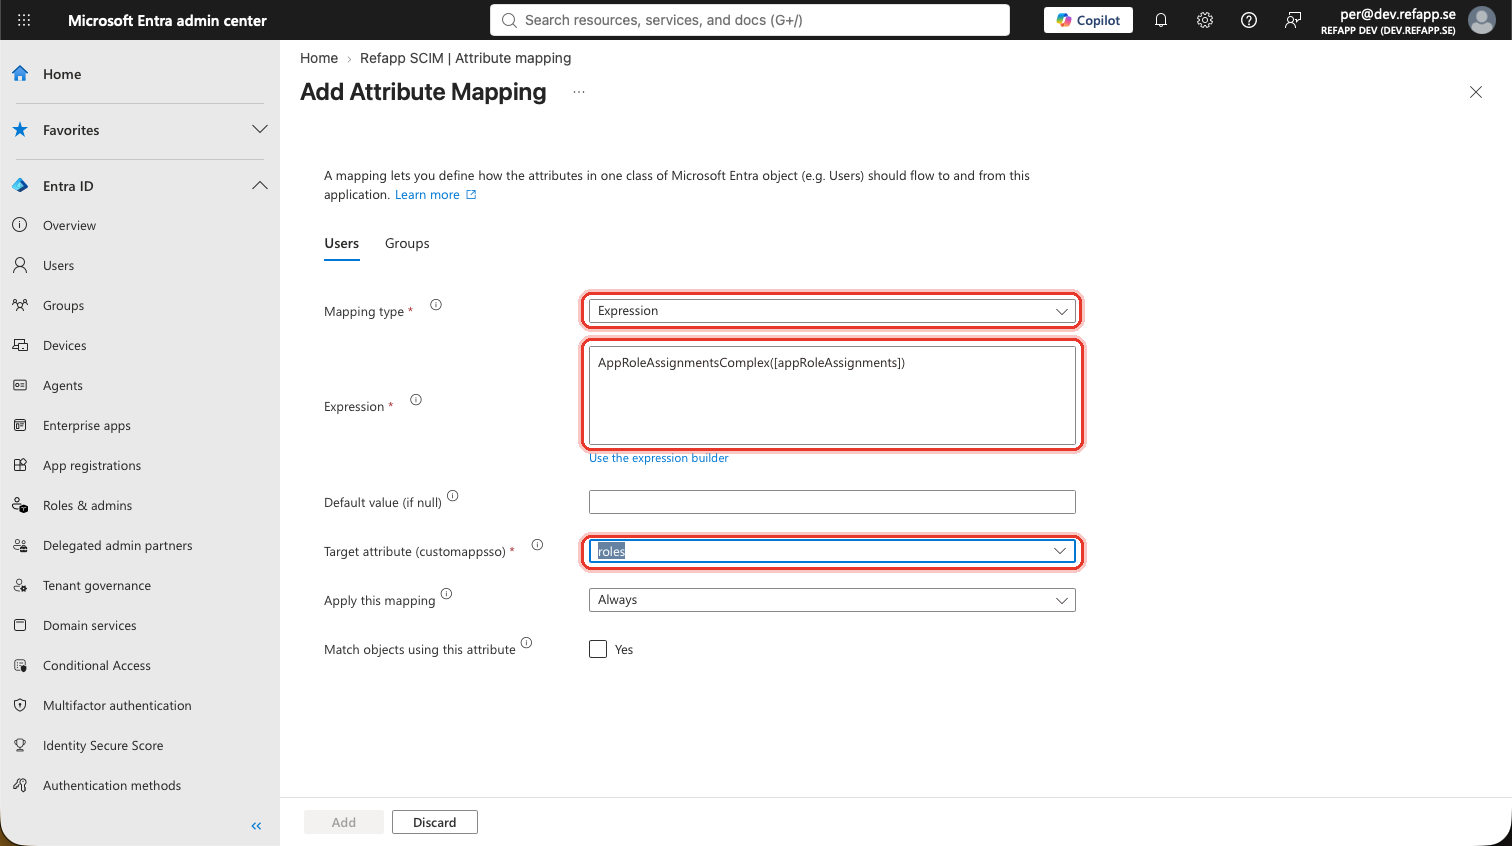
The Add button stays greyed out until you pick the target attribute from the list. Typing
rolesinto that box is not enough — it looks filled in, but the form does not count it as chosen until you select it from the dropdown. If Add is disabled and you cannot see why, this is almost always it.
The parameter name inside the brackets is the directory attribute
appRoleAssignments, but the function's parameter key issource. If you build this through the expression builder rather than typing it, check the result matches exactly. A near-miss here fails at save time with a schema error rather than silently, which is the one mercy in this step.
Finally, name your app roles after Refapp roles. The value that reaches Refapp is the app role name, and Refapp recognises exactly these:
| Refapp role | What it is |
|---|---|
Administrator |
Full administrative access |
SubAccountAdministrator |
Administrator within their subaccounts |
PowerUser |
|
User |
The ordinary role |
LimitedUser |
|
MeetingNoteTaker |
If background checks or criminal record extracts are enabled for your company, you can additionally assign BackgroundCheckInitiator, BackgroundCheckReviewer, BackgroundCheckLimitedReviewer, CriminalRecordExtractInitiator, CriminalRecordExtractReviewer and CriminalRecordExtractLimitedReviewer.
Matching ignores case. Three behaviours are worth knowing:
- A name Refapp does not recognise is discarded silently. A typo in an app role name does not raise an error; the role simply never arrives.
- A role your company is not licensed for is discarded, not refused — so the same Entra role mapping can serve several companies.
- If nothing survives, the create is refused with a
400. A user must end up with one of the six roles in the table above. If you assign only a background-check role, or only a misspelt one, the user cannot be created at all.
Where a user picks up more than one of the six, the highest wins.
Assign roles to users and groups under the application's Users and groups page as normal.
Checkpoint. Your finished mapping list should look like this:
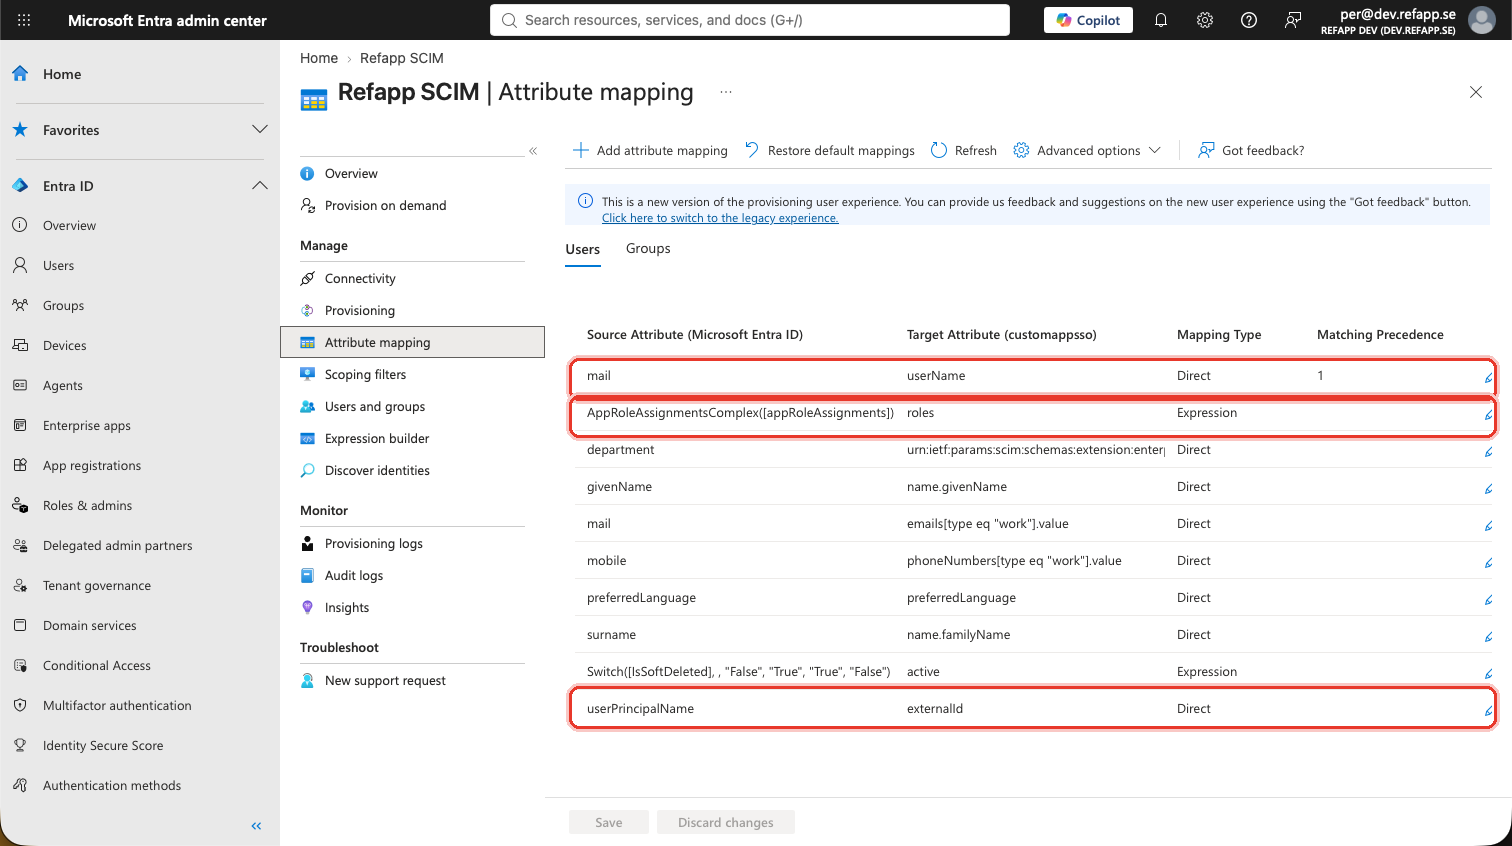
Compare yours against it before continuing. It is much cheaper to spot a missing mapping here than after a failed provisioning cycle.
9. Restrict provisioning to assigned users and groups
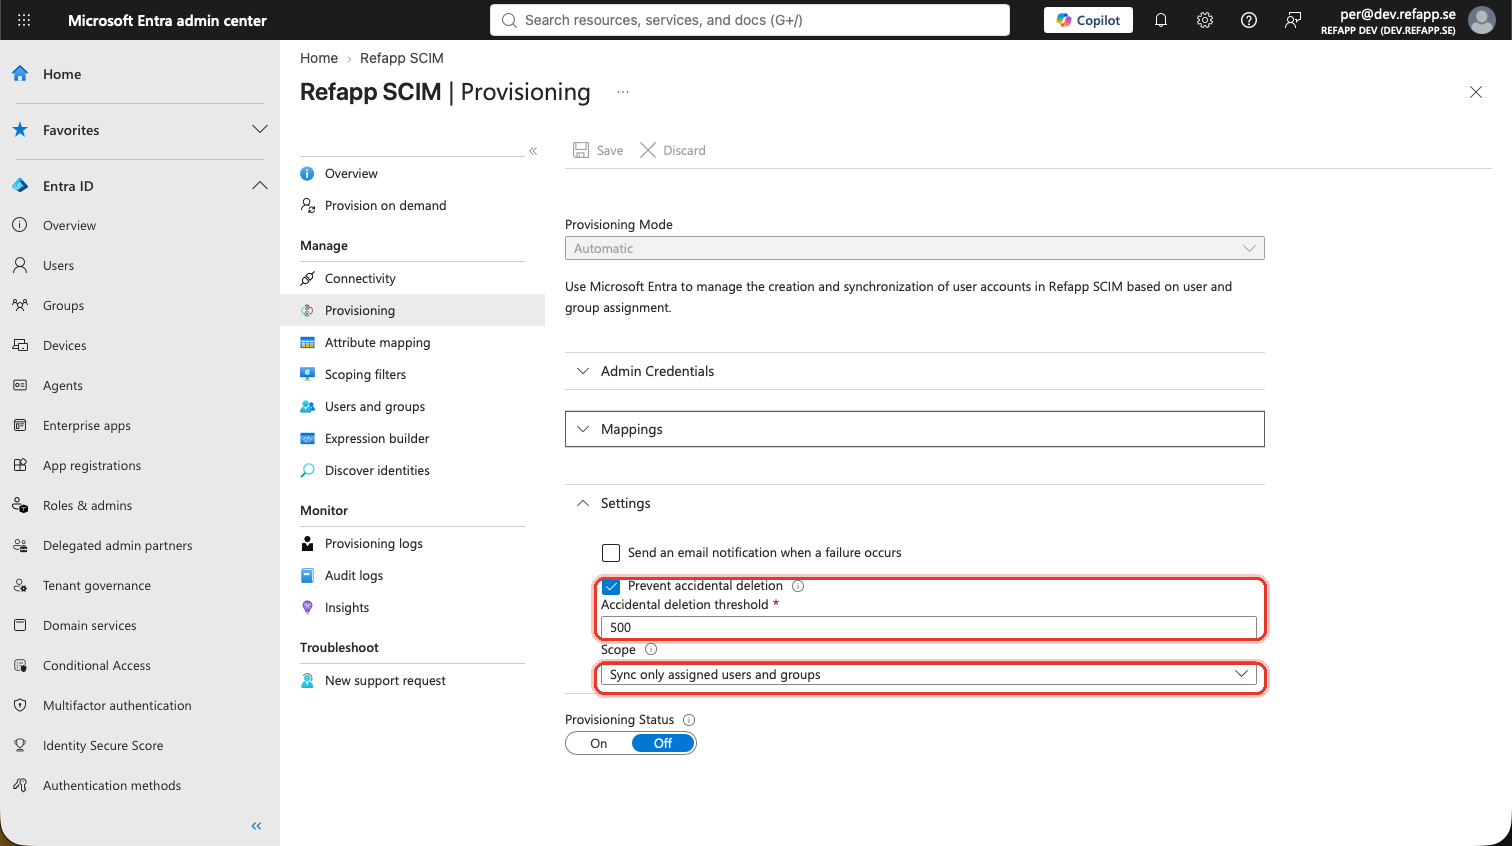
On the Provisioning page, expand Settings, and check:
Scope: Sync only assigned users and groups
This is usually already the default — but check it rather than assume it, because the consequence of it being wrong is invisible.
If you skip this: this is the worst silent failure in the guide, because it breaks the step you just did.
AppRoleAssignmentsComplexonly works under an assigned-users scope. UnderSync all users and groupsit does not error — the roles attribute is omitted entirely from every request, and Refapp creates each user with a default role instead of the one you assigned. Everyone is provisioned, everyone is in the wrong role, and nothing anywhere reports a problem.
10. Turn on accidental deletion protection
In the same Settings section, Prevent accidental deletion is already switched on. The trap is the number next to it: Accidental deletion threshold defaults to 500.
That is the number of deprovisions in one cycle that will stop the sync instead of proceeding. For an organisation of any normal size, 500 is far more than the entire headcount — so the protection is on, and it will never once fire.
Lower it. Pick a number comfortably above your normal weekly departures and well below your headcount; for most organisations something in the range of 10–20 is reasonable.
Refapp has its own independent guard on the receiving side, at a deliberately different threshold, so that the two layers cannot fail for the same reason at the same time. Ours refuses once a company exceeds the greater of 10 users or 25% of its users, within any rolling 24 hours, and it answers:
HTTP 503   Retry-After: 3600
{"status":"503","detail":"Refusing to deprovision more than N users within 24 hours"}
If you see that, Refapp support has already been alerted automatically — you do not need to report it. Entra will retry, and the refusal clears by itself as deprovisionings age out of the 24-hour window. If the deprovisioning was intended and legitimate, contact support and we will raise the limit rather than making you wait it out.
Set your own Entra threshold on its own merits rather than trying to match ours.
If you leave it at 500: a mistaken group edit or a directory sync problem can deprovision your entire user base in a single cycle without ever tripping the guard. Seeing the checkbox already ticked is not enough — the threshold is what does the work.
Groups and subaccounts — optional
This whole section is optional. Group provisioning exists to place users in subaccounts, and if you do not use subaccounts, or you would rather manage membership in Refapp, you can skip it entirely: provision Users only and leave Groups switched off. Everything else in this guide works exactly the same.
Nothing degrades when you skip it. Users are still created, updated, suspended and deprovisioned normally — they simply have whatever subaccount access you give them in Refapp, and the directory does not touch it.
Skip it if you like, and read on only if you want the directory to own subaccount membership.
A SCIM group in Refapp is a subaccount, not a permission and not a team.
Group provisioning matches on name: the displayName of the Entra group is compared against the SSO group names configured on each Refapp subaccount. The comparison ignores case, but nothing else — it is otherwise an exact match, so trailing spaces and punctuation differences matter.
To use it:
- Fill in SSO group(s) on each Refapp subaccount, under Company settings → Subaccounts. One group name per line.
- Create or choose Entra groups with matching names.
- Assign those groups to the Enterprise Application.
- Enable Groups as well as Users in the provisioning mappings — both
Provision Microsoft Entra ID UsersandProvision Microsoft Entra ID Groupsset toEnabled. (Leaving Groups disabled is what "skipping this section" means.)
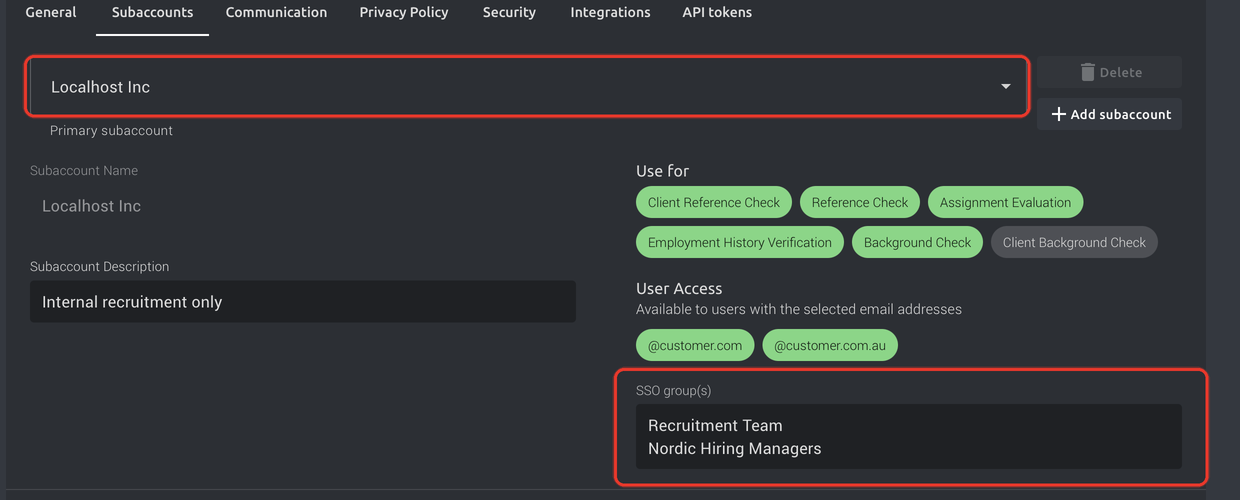
Each subaccount has its own list, so pick the subaccount at the top of the page first. The names must match your Entra group names, one per line.
A user who belongs to no group is fine. They are provisioned normally; they simply have no subaccount access until they are put in a group. Some other vendors require every user to be in at least one group — Refapp does not, and you do not need to invent a catch-all group to satisfy us.
A group whose name matches no subaccount is ignored rather than created. Refapp does not create subaccounts from the directory.
Refapp only manages subaccounts that have opted in by having a list of SSO group names on them. A subaccount with no such list is never touched by provisioning, so you can hand some subaccounts to the directory and keep managing the rest by hand. If no subaccount has a list at all, group provisioning changes nothing — which is the other way of switching this off.
⚠️ Renaming a group does not re-sync its existing members
If you rename a group in Entra, update the matching name on the Refapp subaccount as well — and be aware that members who were already in the group keep their existing subaccount access until their membership next changes. The rename alone does not re-evaluate them.
If you need the rename to take effect immediately, remove and re-add the affected members, or run Provision on demand for them.
Verifying the setup
Do these in order. Each one catches a different class of mistake, and doing them out of order wastes a 40-minute cycle.
- Test connection on the Connectivity page → green. This needs Manage users from your identity provider (SCIM)to be on already; until it is, the test fails like a bad token.
- Assign a single test user to the application.
- Provision on demand for that user. Every step in the result should be green. This is the check that exercises your real mappings, including the roles expression — Test connection does not.
- Sign in to Refapp as that user through SSO. This is the only step that proves
externalIdand the NameID actually agree, which nothing before it does. - Start provisioning and let a cycle run. The first cycle is a full sync of everyone in scope. Cycles run roughly every 40 minutes.
If you provision groups, expect a user to briefly exist with no subaccounts. Entra provisions users before it provisions group membership — a few seconds apart. If you check in that gap you will see a correctly created user who belongs to nothing. This resolves itself within the same cycle and is not a bug. (It cannot happen at all if you are not provisioning groups.)
Deprovisioning
Almost everything Entra does to remove a user suspends them in Refapp. Only one thing deletes them, and it happens on Entra's schedule, not Refapp's.
| What happens in Entra | What Entra sends | What happens in Refapp |
|---|---|---|
| User unassigned from the app | active: false |
Suspended |
| User falls out of scope (e.g. leaves an assigned group) | active: false |
Suspended |
| Account blocked from sign-in | active: false |
Suspended |
| Account deleted in the directory | active: false |
Suspended |
| Deleted account purged from the directory | DELETE |
Deleted, permanently |
A suspended user is kept, with their history, roles and subaccounts, but cannot sign in. Suspension is reversible: re-assign the person, re-enable their account or restore it from Deleted users, and the next cycle sends active: true and they are back exactly as they were — same account, same history, same access.
Deletion is permanent. It happens only when Entra purges the directory account itself, which is when its deleted-users grace period ends:
- Entra controls the grace period, not Refapp. A deleted directory account sits in Entra's Deleted users for 30 daysand is then purged automatically. Microsoft sets that length; neither you nor Refapp can extend it.
- Your Entra administrators can shorten it. Permanently deleting a user from Deleted users before the 30 days are up purges them immediately, and Refapp deletes them in the next cycle.
- You can turn deletion off altogether. Under Attribute mapping → Provision Microsoft Entra ID Users → Target object actions, clear Delete. Purged accounts then stay suspended in Refapp, and anyone who should be removed for good is deleted there by hand.
Once a Refapp user is deleted, re-creating the person in Entra does not bring the account back. It creates a new one, with none of their history attached.
An unassigned user who is never deleted in the directory stays suspended in Refapp indefinitely. Entra stops managing a user once they are unassigned, so it never sends a DELETE for them later, even if the directory account is eventually deleted. Delete them in Refapp if you want them gone.
⚠️ Editing a group assignment suspends users
A user who stops being in scope — because you removed a group from the application, or removed them from that group — is suspended in Refapp. This is normal SCIM behaviour and often what you want, and it is reversible. But it means editing which groups are assigned to the application can lock many people out at once, which is not obvious from the Entra UI. Change assignments deliberately, and keep accidental deletion protection on — it counts suspensions as well as deletions.
If you would rather leave out-of-scope users untouched, Entra has a setting called Skip out of scope deletions. It is off by default.
Common problems
Everything is green but nobody can log in. externalId and the SAML NameID are not sourced from the same attribute, or the NameID format is not Persistent/Unspecified. See step 6 and step 1. This is the single most common way to get a setup that looks perfect and does not work.
409 conflicts every cycle for a user who already exists. Entra is matching on userName, and that person's email address has changed, so the lookup misses and Entra keeps trying to create someone who already exists. See Match on externalId, not on userName.
Everyone has the same, wrong role. The provisioning scope is Sync all users and groups. See step 9.
Users are created but belong to no subaccount (and it has been more than a cycle). First: are you provisioning groups at all? This is expected if you are not — subaccount membership is then yours to manage in Refapp, and the SAML groups claim will not do it for you (And what SCIM takes over). If you are, either the Entra group names do not match your subaccounts' SSO group names (Groups and subaccounts), or the groups are outside the provisioning scope (step 9).
A user fails to create with a 400. The most likely cause is that their email address is outside your company's allowed email domains. Refapp applies that allow-list to SCIM creates exactly as it does to SSO sign-ins. Check the address against Permitted user email domains, under Company settings → Security.
Test connection fails, or credentials will not save. See troubleshooting. Note that Entra sometimes reports a rejected token as a "temporary internal storage issue" in Azure AD; it is not.
Getting help
If you would rather not do this alone, Refapp offers an onboarding package for SCIM provisioning, where we work through the setup with you. To find out what it includes and what it costs, or to book it, contact Refapp support or your customer success representative.
The same goes for anything in this guide that only Refapp can do for you: enabling SCIM configuration for your company, raising the deprovisioning limit, or repairing users provisioned with the wrong externalId.