
Companion to Setting up SCIM provisioning with Microsoft Entra ID. See also SCIM authentication and frequently asked questions.
This page is for companies that already sign in to Refapp with SAML single sign-on and want Microsoft Entra ID to take over creating, updating and removing users.
The setup guide describes every setting. This page is about the move: what to check before you switch, the order to do it in on the day, and how to tidy up the users your directory does not know about. Keep both open — this page links into the setup guide rather than repeating it.
Your users do not notice the move. They keep signing in exactly as before, through the same Enterprise Application, with the same accounts and history. What changes is who is in charge of those accounts: today the SAML sign-in creates and updates them, and afterwards your directory does.
What changes when SCIM takes over
| With SAML only | With SCIM | |
|---|---|---|
| A new joiner's account | Created at their first sign-in | Created by the provisioning cycle, before they sign in |
| Email, phone, cost centre | Updated from claims at each sign-in | Updated by provisioning |
| Roles | From the role claim | From SCIM's roles attribute — same app roles |
| Subaccounts | From the groups claim | From the groups SCIM provisions, if you turn them on |
| A leaver | Keeps their Refapp account until someone removes it | Suspended by the next cycle after they are unassigned or disabled |
| Inviting users by hand in Refapp | Possible | Not possible for your company's own email domains |
Signing in itself does not change: SAML still authenticates every user, and the SAML configuration you have stays exactly as it is. The full list of what SCIM takes over from SAML is under And what SCIM takes over in the setup guide.
How your existing accounts are found
This is the one idea the rest of the page depends on.
SCIM never creates a second account for someone who already has one. On its first cycle Entra looks up every user in scope, and only creates the ones Refapp says do not exist. If a lookup misses someone who does exist, the create that follows is refused, because their email address is already taken — so a missed match shows up as a 409 error in the provisioning logs, never as a duplicate.
Entra looks users up by the matching attributes you set in step 7 of the setup guide, in order:
externalIdis compared with the SSO identity Refapp stored when the user last signed in with SAML. It matches whenexternalIdis mapped from the same directory attribute your NameID sends — which is why step 6 insists on it.userNameis compared with the user's email address in Refapp. This catches everyone who has no stored SSO identity yet — typically people who were invited by hand, or created by an ATS integration, and have never signed in with SAML.
So before you start, the two things worth knowing are whether your NameID has stayed the same over time, and whether the email addresses in Refapp match the mail attribute in your directory. The checklist below covers both.
Before the move
None of this changes anything for your users. Do it in the days before, not on the day.
1. Have Refapp enable SCIM configuration
This is the only step you cannot do yourself. It may require a change to your licensing; contact Refapp support. Once it is on, the API tokens tab appears under Company settings.
Enabling SCIM configuration changes nothing for your users. Provisioning only starts when you switch it on yourself, on the day.
2. Generate a token
Under Company settings → API tokens, click Create token and store it somewhere safe — it is shown once. The page also shows your complete tenant URL. See SCIM authentication.
If token creation is refused, Use nameid-format:persistent is off under Company settings → Security. Refapp switches it on when SAML is first set up, so most companies already have it. If yours is off, switch it on and test a sign-in straight away: it changes the NameID format Refapp asks Entra for, and SSO identities are only recorded with it on. Do this days before the move rather than on the day, so users pick up an SSO identity as they sign in.
3. Check your SAML configuration
Work through Part 1 of the setup guide. For a company already on SSO, two of its points matter most:
- Write down which attribute your NameID sends, and do not change it. Your users' stored SSO identities came from it.
externalIdmust be mapped from the same attribute. - If the NameID was ever switched to a different attribute, users who signed in before the switch still carry the old value — Refapp never overwrites a stored SSO identity. They will not match on
externalId, and fall back to matching onuserName. That works, but only as long as their email address does not change. Mention it to Refapp support if this applies to you.
4. Make sure the right people are assigned
On the Enterprise Application's Users and groups page, check that everyone who should keep using Refapp is assigned, directly or through a group.
This matters more than it did with SAML alone. Assignment used to decide only who could sign in. Once provisioning runs, a user who is not assigned is never managed by Entra at all, and new joiners who are not assigned are never created.
5. Give every assigned user a Refapp role
Each assignment must carry an app role named after a Refapp role — the list is under step 8 of the setup guide. If you already send roles in a SAML claim, the same app roles carry over unchanged.
⚠️ An existing user without a recognised role loses access
For a new user, a missing or misspelt role is refused with a
400and nothing is created. For a user who already exists, it is not refused: the update goes through, the user ends up with no role, and they can no longer sign in.This bites hardest where roles have been managed by hand in Refapp until now, because nothing in Entra describes them yet. On the first cycle, every in-scope user's roles are replaced by what Entra sends. Set up the app role assignments first, so that what Entra sends is what you want them to have.
6. Compare email addresses
For users who have never signed in with SAML, matching falls back to email address, so the address in Refapp must be the one in the directory's mail attribute. Spot-check a handful, especially anyone whose address has changed — a name change, a domain change, a merger.
If your company uses plus-addressing, those accounts are fine as they are: if Refapp stores anna+acme@example.com and your directory has anna@example.com, matching finds it. See the FAQ.
7. Decide about subaccounts
- If you map subaccounts from the SAML groups claim today, you will want group provisioning on as well, or subaccount membership stops updating once SCIM takes over. The SSO group(s) you already have on each subaccount are what group provisioning matches against too, so there is nothing to re-enter — provision the same groups your claim sends today. See Groups and subaccounts.
- If you manage subaccounts by hand in Refapp, leave group provisioning off, and nothing about subaccounts changes.
8. Pick a time
The move itself takes under an hour, and there is a window in it where new joiners cannot get in — see the next section. Choose a time when nobody is expected to start, and when you can sign in as a test user.
On the day
Do these in one sitting, in this order.
1. Switch provisioning on
Under Company settings → Security, switch on Manage users from your identity provider (SCIM).
This has to come first: Refapp does not accept the SCIM token until it is on, so Entra's Test connection fails before this point.
From this moment:
- Your existing users are unaffected. They sign in as before.
- Nobody new is created at sign-in. Someone without a Refapp account who tries to sign in is told that auto-provisioning is disabled. Until provisioning is running, nobody new can get in — this is the window to keep short.
- SAML stops updating email, roles, phone, cost centre and subaccounts.
- Disable user auto-provisioning for SSO, Authentication via SAML SSO and Use nameid-format:persistent are switched on and locked for as long as SCIM is on.
2. Configure provisioning in Entra
On the same Enterprise Application, work through Part 2 of the setup guide, steps 5 to 10: connect with the tenant URL and token, map externalId to your NameID attribute, set the matching precedence, create the roles attribute, set the scope, and lower the accidental deletion threshold.
Test connection should now pass.
3. Provision one existing user on demand
Use Provision on demand on a colleague who already has a Refapp account — not a new one. Two things to check in the result:
- The user was matched, not created. Entra should report finding the existing user and updating it. If it tries to create them and fails with a
409, matching is not finding existing accounts: checkexternalIdagainst the NameID, and the matching precedence, before going any further. - The roles are right. Open the user in Refapp and check the role came through.
Then have that colleague sign in through SSO. That proves the account Entra matched is the account SAML signs in to.
4. Start provisioning
Start provisioning and let the first cycle run. It works through everyone in scope — creating the people Refapp does not have yet, and updating the ones it does. For a large directory the first cycle can take a while; later cycles run roughly every 40 minutes and only handle what has changed.
New joiners can sign in once the cycle has created them.
After the first cycle
Check the provisioning logs
In Entra, open Provisioning logs and filter on failures. For a move from SAML, look for:
409 uniqueness— Refapp already has this person, and Entra could not find them. Their email address in Refapp differs from the directory, and they have no SSO identity that matchesexternalId. Correct the address on one side and Entra retries automatically, on a back-off that doubles each time — use Provision on demand to retry straight away.400— usually an email address outside Permitted user email domains, or a new user with no recognised role.
Find the users your directory does not manage
After the first cycle, some Refapp users will typically have been left alone by Entra: leavers nobody removed, people who were never assigned, test and shared accounts. Entra manages only users in scope, so these are never updated, suspended or deleted. They keep signing in exactly as before.
Refapp shows you who they are. On the Users page of your company profile, the Last SCIM sync column shows when provisioning last handled each user. It appears only while SCIM is switched on. A dash means provisioning has never handled that user.
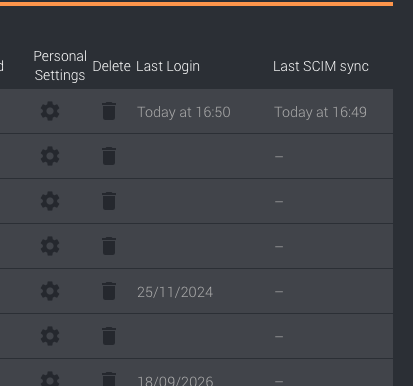
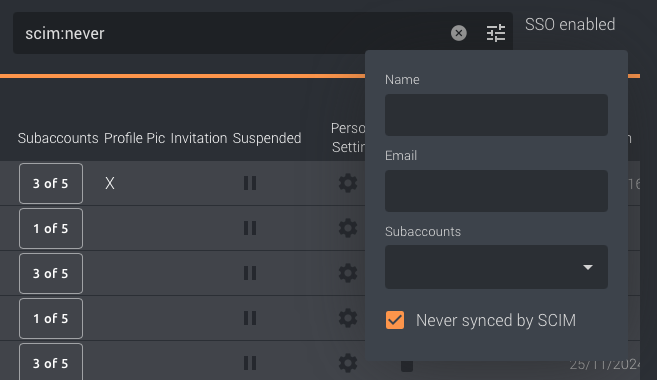
To list only the users it has never handled, open the filter — the icon at the end of the search box — and tick Never synced by SCIM. Typing scim:never into the search box does the same.
For each user on that list, decide which it is:
| The user is… | Do this |
|---|---|
| Someone who should be in Refapp | Assign them to the application in Entra. The next cycle picks them up. |
| Someone who should not be in Refapp any more | Delete them in Refapp. The list supports selecting several at once. |
| Someone whose email domain is opted out of SSO | Leave them. Provisioning never handles these domains, so they always appear here. |
Deleting a user is permanent, so look at the list properly before deleting anything from it. Someone who is missing only because they were never assigned is much easier to fix by assigning them.
The column records the most recent time provisioning handled a user, not whether they are in scope right now. A user who leaves scope is suspended by Entra, and is stamped in the process, so they do not show up as never synced.
Check subaccounts
If you turned group provisioning on, check a few users who belong to subaccounts.
- People who are in a provisioned group have their membership of every subaccount with SSO group(s)recalculated from their groups alone. Exceptions made by hand on those subaccounts are dropped for them.
- People in no provisioned group keep whatever subaccount access they had before the move, including access the SAML groups claim gave them. Nothing removes it automatically. If they should not have it any more, add them to the right group in Entra or remove the access in Refapp.
Rolling back
If you need to go back to SAML-only, switch off Manage users from your identity provider (SCIM) under Company settings → Security, and pause provisioning in Entra.
- SCIM stops at once. Refapp refuses the token from that moment, so Entra's cycles fail until you pause them.
- SAML resumes updating email, roles, phone, cost centre and subaccounts at each sign-in, straight away.
- New users are still not created at sign-in. Disable user auto-provisioning for SSO stays on after SCIM is switched off. Switch it off yourself if you want sign-in to create new users again.
- Nothing is lost. Accounts created by SCIM stay, and sign in normally.
You can switch SCIM on again later. The same tokens work again, and Entra's next cycle finds the existing accounts in the usual way.
Getting help
If you would rather not do the move alone, Refapp offers an onboarding package for SCIM provisioning, where we work through the setup with you. Contact Refapp support or your customer success representative.
Contact support as well for anything only Refapp can do: enabling SCIM configuration, raising the deprovisioning limit, or repairing users whose SSO identity no longer matches your directory.