
To manage the users in your account go to 'Users' in Refapp. Access the main menu in the top right corner and select Users.
Here you can see all users connected to your Refapp account, together with their current access rights and subaccount access.
1. How to invite new users
2. How to manage access rights in Refapp
3. How to give a user access to subaccounts
4. How to remove or suspend a user
1. How to invite a new user
You can invite colleagues to your Refapp account directly from the Users section.
- Go to Users in the main menu.
- Click Invite in the top right corner.
- Enter the user's details.
- Select the appropriate access rights for the user.
- If applicable, select which costcenter the user should be connected to, and subaccounts the user should have access to
- Send the invitation.
The user will receive an invitation to Refapp and can use it to access the account.
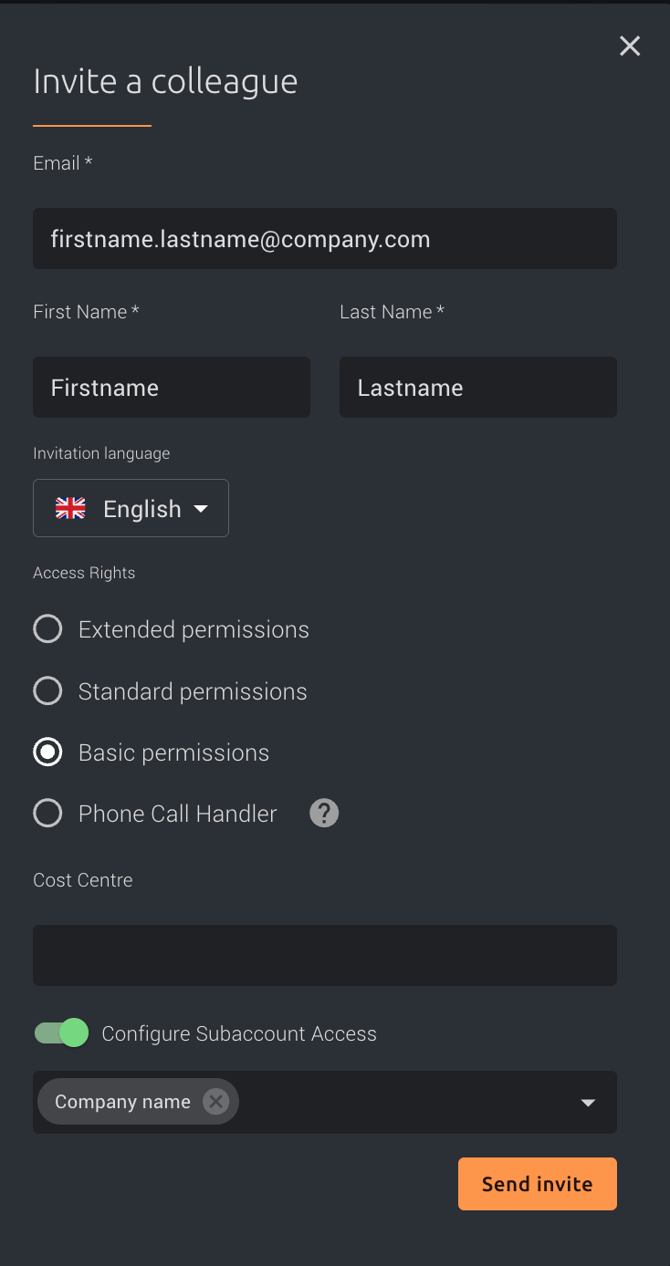
Tip: Consider the user's role and responsibilities when choosing their access rights. You can update these permissions later if their role changes.
2. How to manage access rights in Refapp
You can control what each user is allowed to do in Refapp by managing their access rights.
In the Users overview, each user has their current permissions displayed under Access Rights.
To update a user's permissions:
- Find the user you want to update.
- Click the access rights dropdown next to their current permissions.
- Select the appropriate access level or permissions.
- Save or confirm the changes, if prompted.
Depending on your Refapp setup you, the access rights can vary.
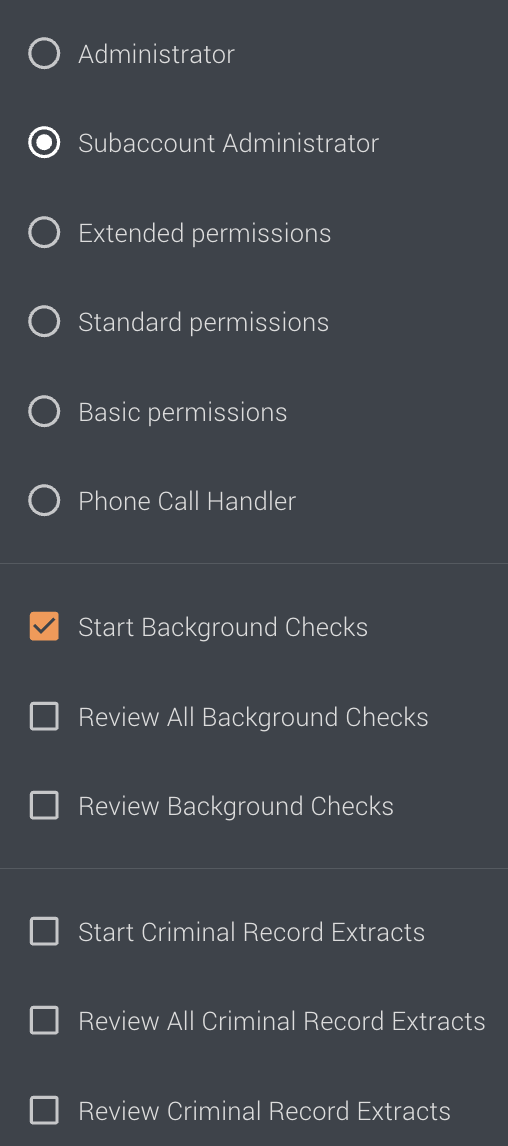
The available permissions determine which areas and actions the user can access in Refapp.
Users with Administrator access have access to manage the Refapp account and its users. Only give administrator access to users who need to manage the account.
3. How to give a user access to subaccounts
If your organisation uses subaccounts, you can control which subaccounts each user can access.
You can see a user's current subaccount access on the right-hand side of the Users overview.
To add or change subaccount access:
- Find the user you want to update.
- Open the user's access rights or subaccount access settings.
- Select the subaccount(s) the user should have access to.
- Save or confirm the changes.
A user can have access to one or several subaccounts, depending on their role.
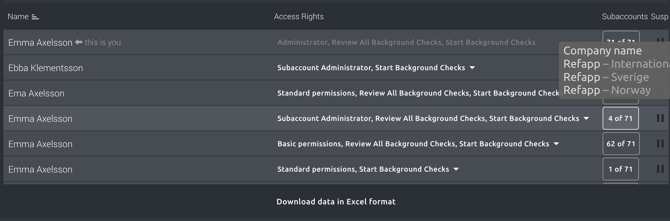
Subaccount Administrator
If a user should be able to administer a specific subaccount, they may need Subaccount Administrator access.
This is different from giving the user access to the entire Refapp account. Make sure to select the appropriate level of access based on what the user should be able to manage.
Example: A manager responsible for one business area may only need access to their specific subaccount, while a central administrator may need access to all subaccounts.
4. How to remove or suspend a user
When a user should no longer have access to Refapp, you can suspend or delete their user account.
- Go to Users.
- Find the user you want to suspend.
- Use the suspend option on the right-hand side of the user.
- Confirm that you want to suspend the user.
Once suspended, the user will no longer be able to access Refapp.
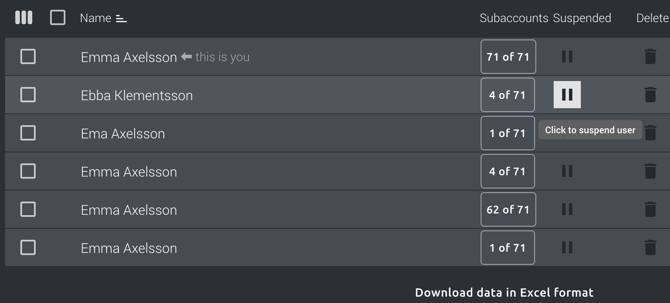
Suspending a user is useful when someone leaves the organisation, changes role, or temporarily should not have access to Refapp.
Want to know more what happens when you delete a user? Get more details here:
If your organisation uses SCIM provisioning, remove users in your identity provider instead — see Managing users with SCIM provisioning below.
Managing users at a glance
From Users, administrators can:
| Action | What you can do |
|---|---|
| Invite users | Add new colleagues to your Refapp account |
| Manage access rights | Control which features and actions a user can access |
| Manage subaccounts | Give users access to specific subaccounts |
| Suspend users | Remove a user's access to Refapp |
Managing users with SSO
If your organisation uses Single Sign-On (SSO), you can also manage user access to Refapp centrally through your identity provider.
With SSO, user access can be managed from your organisation’s identity and access management system, including onboarding and offboarding colleagues. This means you can control who has access to Refapp without having to manage every user manually in Refapp.
SSO can be particularly useful for larger organisations where user access needs to be managed centrally and automatically.
Note: SSO and SCIM are add-on features. If you are interested in setting up SSO/SCIM for your organisation, contact Refapp for more information at support@refapp.com
Managing users with SCIM provisioning
If your organisation also uses SCIM provisioning, your identity provider (such as Microsoft Entra ID) creates, updates and removes Refapp users automatically. Users are then managed there, not in Refapp:
- Adding users: assign the person to the Refapp application in your identity provider. Refapp no longer creates users when they first sign in with SSO.
- Access rights: roles come from the app roles assigned in your identity provider. A role given by hand in Refapp is removed at the next sync.
- Subaccounts: if you provision groups, subaccount access follows group membership in your identity provider.
- Removing users: unassigning someone from the application, or disabling or deleting their account in your identity provider, suspends them in Refapp. Their account and history are kept, and re-assigning or restoring them brings them back.
A user is only deleted permanently when your identity provider purges the deleted account. In Microsoft Entra ID that happens 30 days after the account is deleted, or sooner if an administrator deletes it permanently. That grace period is controlled in your identity provider, not in Refapp.
Read more in Setting up SCIM provisioning with Microsoft Entra ID and the SCIM provisioning FAQ.